Tuesday, March 19, 2013

Feathers of Gold // Bloglovin'

Hello, all!

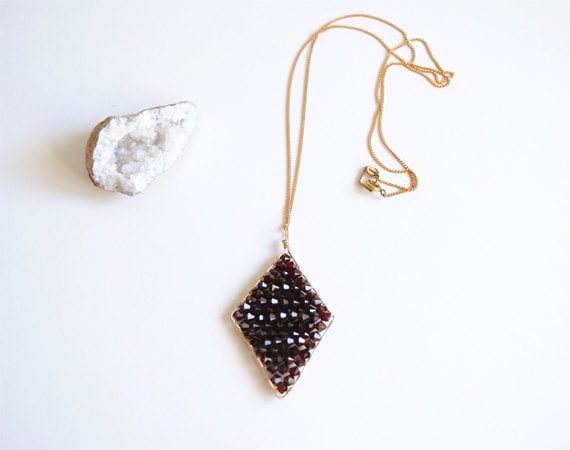
My dear friend Jessica recently opened her Etsy store, feathers of gold, and I absolutely insist that you pay her a visit. Her handmade jewellery has a strong art deco vibe and the pieces are simply gorgeous. As a violent admirer of her style, I had to be the first to snatch up one of her creations!

© feathers of gold 2013

Mad love.

Check out the rest here. And her beautiful blog. Go on…

Speaking of blogs, are you on Bloglovin'? I signed up (as I'm sure you've all heard about Google Reader by now) and I love the interface! It's so clean and beautiful:

Preeeeetty.

Click here if you want to keep up with owlswakeup! :)

Saturday, March 16, 2013

A Tooth For An Eye

Happy Saturday!

It has been such a busy week! I have spent a ton of time just getting my workspace ready for my next update (spring cleaning takes us all over eventually) as well as prepping some new DIY tutorials! The Beaded Fringe Necklace had such an overwhelmingly wonderful response that I can't wait to post more! A friend of mine let me know that a Michael's opened up on Yonge Street so that makes future crafty supply shopping super easy ;) Lots of fun summer DIYs coming your way soon!

Stuff gets tossed into this box…never to be seen again.

Folding, folding and refolding.

So besides getting my act together and cleaning my crafty space, this weekend I am spending quality time with my new favourite toy. This will likely be the routine for all weekends to come…at least until it starts getting sunny in the evenings! Bring it on, spring!

LOVE.

This was taken last weekend when the path by my home was pure ice.
Such a difference now! Can't wait until it turns green :)

Probably the most exciting thing that has happened recently next to the camera would be the release of "A Tooth for an Eye" by my true loves, The Knife. This video is so much fun (sparkler dance class!!), the song has beyond exceeded my expectations—there will be no need to listen to other music when this album comes out. ;) I absolutely cannot wait. There is so much to get excited about and I love it!


Get outside!

Wednesday, March 13, 2013

DIY Beaded Fringe Necklace

Hello and welcome! Today's DIY is the super easy and lovely beaded fringe necklace:

This tutorial is for the red one :)

Supplies: beads, chain, jump rings, headpins, wire cutters, pliers and round-nosed pliers.


If your headpins were all wonky like mine, I find a quick fix is to flatten them between the thickest part of your pliers.

String your beads on your headpins in whatever design you prefer. Go solid, go stripey, go wild. I have used 7 headpins, varying the number of beads per pin to create a triangular shape. I wouldn't use more than 7, however, because they might not fit on the pin at the end otherwise.


Using your pliers, bend the end of your pin at a 90 degree angle.


Trim the ends with your wire cutters, leaving just slightly less than a centimetre of wire left to form a loop.


Using your round-nosed pliers, carefully bend the wire into a loop. This part can be awkward so practice makes perfect! Bending the wire first helps get an even circle. Set aside and repeat these steps until you have enough headpins to make your fringe.


Measure out your chain. I made my necklace 26 inches (66 cm) long. If you want to do a different length, the best way to know where to cut is to either test out the chain in front of a mirror and/or check out a diagram. Always cut more chain than you think you need.

If you decide to make a shorter necklace, it is simple to add a clasp. You'll need two extra jump rings and a clasp of your choice. Clip your strand of chain in half and open up jump rings with your pliers to attach your chain to your clasp. Easy peasy!

Trim the stumpy end off one more headpin and then make a loop. To do this you'll bend the wire down at a 90 degree angle (again leaving slightly less than 1 cm) and use your round-nosed pliers to carefully make the loop.


You can also use an eye pin for this step if you have one long enough! Eye pins are just like headpins (available in all colours and lengths) only they have a loop at one end instead of a stump. But it is easy to make your own out of headpins if you don't have any :)

String your beaded strands onto your new pin as shown below, alternating beads in the colour of your choice as spacers to keep the fringe hanging evenly. Bend the wire to create a final loop at the end of this pin. These loops are where we will be attaching the rest of the necklace.


Using your pliers, open up your jump rings and slip on one end of your pendant and one end of your chain. Close the jump ring again using your pliers and repeat for the other side. And that's it! You're done!


Try out different colours and patterns!


Sunday, March 10, 2013

OWU Spotlight: Large Clutch

Hellooo! It is absolutely gorgeous in Toronto this weekend, I am finding any excuse to get outside!! After seeing a dude in shorts last night I think it's safe to say we're done with winter, no? :)

Today's owlswakeup spotlight is the Large Clutch. This design was one of the very first in my shop and after doing the model shoot I was reminded of how much I love it! It's a great size with fun fabric combinations and versatility. My next update will hopefully have some new versions of this style.


Hi!

1. Cream Diamonds
2. Black and Gold Tapestry
3. Blue and Brown Leaves
4. Cream and Taupe Floral

Have a wonderful weekend!

Wednesday, March 6, 2013

Wednesday Wishlist

So last week I made a rather impulsive purchase—a new camera! Granted I had been debating buying one for a while, but then one evening the decision was made. There is still so much to learn but I am super excited to get some serious practice in this weekend. However, now that I've spent all my money I can go back to lusting after pretty things:


1. Evenings in Quito Pitcher by Michelle Morin and Anthropologie
2. Low Wedge Sandals by Marc by Marc Jacobs from Shopbop
3. Oversized Stud Earrings by Dara Ettinger from Shopbop
4. Fall Festival Necklace by Madewell from Shopbop

Sunday, March 3, 2013

DIY Braided Knit Headband


Cabling is deceptively simple so if you're a knitter who has yet to learn, get your hands on a video tutorial (www.newstitchaday.com is fabulous!) and prepare to have your mind blown. Then proceed to blow the minds of your friends with your awesome creations.

I recently made a three-strand braided headband and it was so much fun to make that I decided to step it up a notch. This 5-strand braided headband is perfect for transitional weather and works up in an evening!

What You Need:

Bernat Roving (I used a little over half a ball, but it's dependent on the length you make it)
Size 13 needles
Yarn needle
Cable needle

Cast on 17

Rows 1 and 5: P1, K15, P1

Rows 2, 4, 6 and 8: K1, P15, K1

Row 3: P1, K3, *cable 3 forward (slip 3 stitches off onto your cable needle, hold in front, K3, K3 off the cable needle), rep from * once more, P1

Row 7: P1, *cable 3 back (slip 3 stitches off onto your cable needle, hold in back, K3, K3 off the cable needle), rep from * once more, K3, P1

Repeat rows 1-8 until your headband is snug enough around your head without stretching out the pattern. Bind off, sew ends together using your yarn needle and weave in the tails. The width should be about 3.5 inches, dependent on your tension. :)


Be warm and happy. Spring is almost here!

Saturday, March 2, 2013

A Small Update [3-2-13]

Behold! A few new things in the shop today:

Meet the four new lovelies :)

Blue and Brown Leaf Patterned Envelope Clutch

Black and Gold Tapestry and Black Vinyl Tote Bag

Black Cotton and Brass Studded Pouches

Also be sure to check out the rest of the new photos throughout the shop! It's been a long week of photo editing so I hope you like the new look!