Showing posts with label inspiration. Show all posts

Sunday, May 18, 2014

Lately...

What's up?

It's mid May and it's still cold. We had a week of warmth and then went right back to cold. I feel like we are going to skip spring entirely and just be head first into summer. Which, frankly, I'm ready for!

I've been working hard at some new designs--hopefully they will all be ready to debut at a few shows in the coming weeks! But more about that later. ;)

Onwards to the picture post.

I could spend all day supply shopping.

Feeding chickadees. These guys were super eager!
(Apologies for my blinding hand.)

Beautiful marble patterns.

Finally perfected my packaging game. At least for now...

There was a brief period where I thought I was done with socks.
That time has ended. Welcome back, socks.

New card holders! Among the few prototypes a'comin!

xox

Wednesday, December 18, 2013

Favourite Christmas DIYs

Every year before Christmas I get super excited about all the things I want to make. Then I blink and it's Christmas Eve and I've barely wrapped any gifts yet. One day I will be on top of things! For now, here are a few of my favourite DIYs this year that I didn't have time for:

Vintage Inspired Hanging Birds - A Beautiful Mess

DIY Brass Tack Baubles - Fellow Fellow
15 Creative Tags compiled by Apartment Therapy
Balsa Wood Diamond Ornament - A Beautiful Mess
Holiday Snowflakes - The Pink Couch

Tuesday, October 15, 2013

Office


Hello! I meant to write this post ages ago but it just kept getting pushed and pushed but now here we are! When I moved into a new job in the past few months, that also meant moving into a new workspace. I had some time to prepare for this so I devised a strategy which was basically "spend no money." I think I did pretty darn well! I tried to use as many things that I already owned and then thrifted the rest. When it came to actual artwork, I took to the internet for free images and hit BANK with the Biodiversity Heritage Library flickr page.

Thousands and thousands of gorgeous copyright free images it was extremely difficult to pick! I had an idea of what I wanted but when confronted with that much selection it took a while to narrow it down. In the end I picked 5 florals (one is now a binder cover) and 4 butterflies for my bulletin board. I resized everything in Photoshop and edited the images to make them more vibrant and consistent with one another.

Botanical images sourced from the Biodiversity Heritage flickr page.
Edited in Photoshop, printed at Staples. $7 total.

There's some work stuff on there...somewhere.
Instagram prints from Printsagram.

The back wall cluster was another challenge. As you can tell, I make great use of my floor when it comes to planning arrangements! The three watercolour birds are from Michelle Morin, the top left watercolour is from a trip to Lisbon and the photograph from Irene Suchocki.

Planning. All prints I already owned, bottom 3 frames thrifted.

Abrasive office lighting on the back walls. Broken lamp.
Tea credenza in progress.

 Gorgeous floral prints that matched my office decor perfectly.
An unreal Salvation Army find for $8 total.

Love everything about this wall. See the yarn basket?
Two camera images from Design Editor, printed at Staples. $10 total.

Dollar store jar, painted and sanded.

Needless to say I had tons of fun decorating this office! I don't have an office at home--all my workspaces are in the same room--so I approached this space as an extension of my apartment and I did so on a budget! Nesting happened immediately...and working, too, I guess. ;)

Thursday, October 10, 2013

Favourite Artist: Jeremy Miranda

My other favourite artist in the world is Jeremy Miranda, and he happens to be married to my other fav Michelle Morin! I can only imagine how gorgeously decorated their home must be.

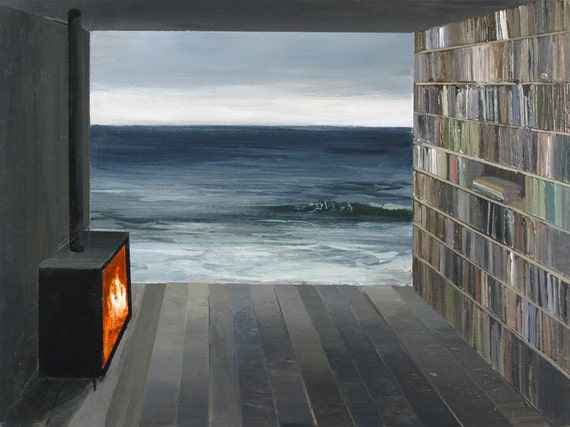
I love things that make me feel. Just that. Jeremy's treatment of light evokes such strong feelings that I'm floored whenever he releases something new. He has this ability to perfectly capture every emotion in his work; especially the unexpected ones.

One of my favourites is Yellow Room. (I missed out on the original of this one last year and I immediately wrote to Jeremy, begging him to make me a print. Which he happily obliged.)

Yellow Room

Rose Light: I have the original of this on my bookshelf... Actually, my home is a split of Michelle's and Jeremy's art.

Rose Light Greenhouse

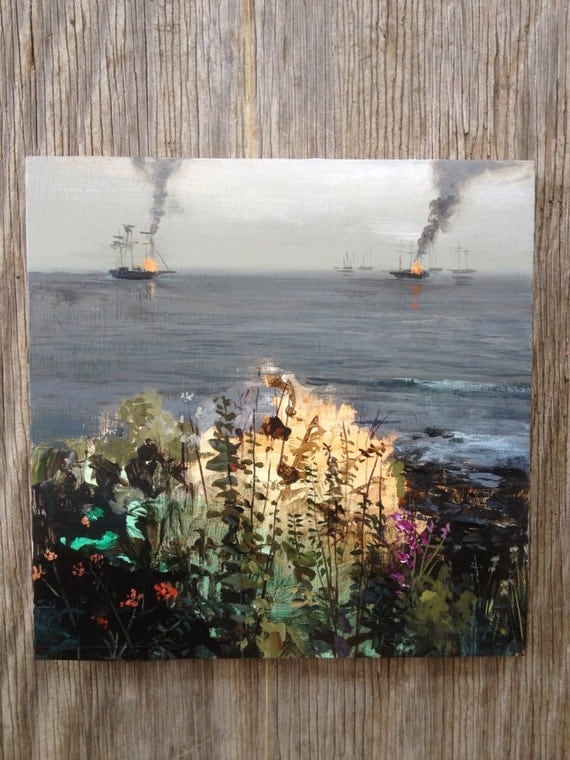
Explodey ships: Also sold out, I will likely have to beg for a print of this one, too. There's something about the contrasting chaos and beauty that totally does it for me.

Harbor

Library

Monday, October 7, 2013

DIY Labels // Custom Stamps


This is not so much a tutorial as it is a suggestion. I was initially hesitant to get a stamp made. I didn't really understand how easy it was going to be, or how inexpensive. When I was decorating my office I had to make a few trips to the Staples Print Centre and while investigating their pricing online, I saw they made rubber stamps. So I just went for it. I figured I'd be monopolizing the Print Centre employee (shout out to Eleanor!) that I may as well do everything all at once. The process involved a webcam chat with another Staples employe. All and all very exciting.


My stamp was only $10 but since I used a non-standard font, it was treated as an image and was created in a slightly different way, for slightly more money. The total was just under $20 and in my opinion was super worth it.


Now that I have my stamp, my opportunities are endless! I can use it on any sort of labels I want, whether it's this cotton ribbon, a different cotton ribbon, or if I want to stamp it directly onto the lining fabric. I can stamp it onto packaging ribbon, or as a seal on an envelope or thank-you card. I can change the inks as much as I want. I can use it on tags for craft shows, or on my friends' skin when they're not looking.

A worthy investment!

Wednesday, September 25, 2013

DIY Spike Necklace


When a good friend of mine was visiting recently we made it a priority to visit Queen West which, for those who don't know, is Toronto's craft mecca. Tons of stores dedicated to fabric, beads, yarn, buttons and ribbon...mmm... My friend spotted these spikey beads in one of the stores and bought a few in gold. I thought they were so fabulous that I had to follow suit and voila! A DIY was born.

What You Need:


Pliers, wire cutters, small spikes, large spikes, jump rings and a clasp.

We found these spikes at Arton Beads in Toronto. They came in gold and silver, plastic or metal. These ones are plastic so the necklace is light and less of a weapon. Each pack came with roughly 25 beads at only a few bucks a pop. Not bad!


Cut two lengths of chain: 17 inches for the short spikes, 18 inches for the long spikes.

If you think you might want a different length for this necklace, always always always cut more chain than you need. Then you can trim to your heart's desire.

To attach the spiked pendants to the chain, you'll be using your pliers to open and close the jump rings.


Starting with the smaller spikes and the shorter chain, string the pendant onto the jump ring and slip it through one of the links in the middle of your first chain.

I started from the middle and worked my way out to ensure that my cluster remained centred. It's a massive pain to do all that work only to have to redo it!

Space them out about two chain links. The spacing totally depends on the size of the links of your chain so test it out. For my chain, I found 1 space left in between looked nicest.


Try to keep your chain as flat as possible when attaching your spikes.

Keep going until you have 2.5 inches of spikes (17 spikes), or, really, however many you want. You don't actually have to listen to me ;)

Once you get a ton of them on the chain they start to fall into a big cluster.

Move on to adding the longer spikes to the longer chain. Repeat the steps above in attaching the pendants however this time I left 3 spaces in between spikes, having a total of 3.5 inches of spikes (13 spikes).


When you are happy with how the spikes are looking, use two more jump rings to attach the chains (again, careful not to twist them) to your clasp and pow!


Ways to change it:
- Increase the number of spikes per chain.
- Increase/decrease the length of chain, creating more a different shape in the final necklace.
- Add a third strand of spikes, maybe a different colour.
- Paint the spikes using a bright nail polish.

Hope you enjoyed this tutorial!

Friday, September 20, 2013

Shop Update: Ikat


It's certainly been a while since I've added things to my shop. I had an explosion of inspiration lately so I can assure you that this round is just the beginning!


Here are some of my favs:


Hope you like them! More to come in a couple weeks ;)

Friday, September 13, 2013

Itching to Knit


With the cooler weather comes the uncontrollable urge to curl up with a cup of tea to make cozy things with colourful yarns. Last year I made seed-stitched cowls, cabled boot cuffs and braided headbands. What should I do this year? I am leaning towards stocking up on pillow forms, thick yarns and whipping up a batch pillows for my bed, but for now here are some fabulous patterns I've come across lately that would make amazing gifts:

Devonshire Cream pattern by Laura Aylor

Chic Easy Shrug by Fine Craft Guild (sign up to view the pattern)

Herringbone Cuddler by Kara Mayfield

Follow me on Pinterest to see more of my favs!

Monday, September 9, 2013

Welcome Back!

Well, hello again! I am officially back in business after my Summer Hiatus. Sometimes it is so necessary to give yourself some time off, to recharge, relax, to step back and take perspective. Also, my apartment doesn't have air-conditioning so sewing was just not an appealing activity for a while. Anyhow, the time has come to get to get back into it!

I've bought tons of new fabric, I have many new ideas for the store, the blog...and maybe even something else entirely. You'll have to check back and see!

For now, here's a peek at what I've been up to.

Hanging out with Feathers of Gold at her craft show last month.

I got a glue gun so I promptly glued things to other things.

I recently moved into a new office at work and so decorating was in order!
More on that later, I promise!

Getting inspired to try some new packaging ideas...

Sneak peek at one of my lovely new fabrics!

See you soon!

Saturday, August 3, 2013

Summer Hiatus

We all get restless. Myself in particular. Like one morning I decided 10 years was long enough to have stretched ears. Or the time I threw out my coffeemaker and switched over to tea. It's become quite clear that I am giving owlswakeup a break for the summer, and that's totally okay. I can't pressure myself into thinking that I should keep going when I am genuinely not in the mood to do so. So a vacation it is.

However, a recent fabric shopping trip got my head filled with all sorts of new ideas. SO. My new plan is not to try to be as productive as I was in the spring and feel sad when I fail to do so, but to get ready to get back into it in the fall. My plan for now is to plan.

Until then.